11.5 SERIAL INTERFACE
![]()
INTRODUCTION |
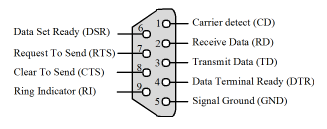
Although Bluetooth, Ethernet, or USB interfaces are commonly used for communication between a computer and peripherals, the communication over the serial interface ( RS-232C) is still widespread since the complexity of the circuit in external devices is lower. That is why the serial interface is still used to connect measuring devices (voltmeters, cathode ray oscilloscopes, etc.) to control devices and robots, and also to communicate with micro-controllers. Modern computers no longer have serial ports, however this problem can be easily solved with low cost USB-to-serial serial adapters. To understand the serial interface it is important to know that there are data lines for sending and receiving data (TD/RD), two pairs of handshake lines RTS/CTS and DTR/DSR, two status lines CD/RI and a ground. You can see the output lines TD, RTS, DTR and the input lines RD, CTS, DSR, CD, RI from the computer. RTS and DTR can thus be activated and deactivated controlled by the program, and CTS, DSR, CD, and RI can only be read. Connections of the 9-pin RS-232 connector: The format of the transmitted data is simple. It consists of chronologically transmitted data bytes. The transfer begins with a start bit, where the receiver calls attention to the pending data transfer. Then the data itself follows, including 5, 6, 7 or (usually) 8 bits. In order to facilitate an error correction, this is usually followed by a parity bit which indicates whether an odd or an even number of bits were set, but the parity bit may also be omitted. The transfer is completed with one or two stop bits. The sending and receiving devices are not synchronized with each other, i.e. the data transfer can begin and end at any time. However, it is necessary that both devices agree upon the same time duration of a single bit. This is specified by the baud rate (in baud, bits/s) and can usually only be any of the standardized values 300, 600, 1200, 2400, 4800, 9600, 19200, 38400, 57600, 115200 baud. In addition, both devices can agree on a handshake (flow control), with which they inform each other whether they are ready for the data transfer. You can distinguish between a hardware and a software handshake depending on whether the handshake uses specific handshake pathways or whether it occurs using special ASCII characters (XON/XOFF) embedded in the data stream. A typical port configuration therefore comprises of: Baud rate, the number of data bits, the number of stop bits, parity none, odd, or even, handshake none, hardware or software. The flow of voltage during the transmission of the letter 'B', with the configuration 7 databit/no parity/1 stopbit looks thus as follows. |
INSTALLATION |
The use of the module pySerial described here works under a 32- or 64-bit operating system, however only with a 32-bit-Java Runtime Environment (JRE). You can download this from here. The following additional installation steps are necessary (Lib is a subdirectory of the directory where tigerjython2.jar is located):
SIMPLE TERMINALFor the time being, you should look around in the documentation of pySerial. On https://github.com/pyserial/pyserial under pySerial API, you will find a complete description of the classes. However, some of them are platform specific. With your program, you can send characters that you enter on the keyboard one at a time to an external device and write out characters you receive back in a console. It is the simplest form of a terminal emulator. To test it out, you have two options. You can either connect two computers via a link cable which swaps RD (Receive Data) and TD (Transmit Data) and execute the program run on both, or you can just join these two pins together (hot-connect them with a clip or a similar object). Then all sent characters will be immediately received again. import serial from gconsole import * makeConsole() setTitle("Terminal") ser = serial.Serial(port = "COM11", baudrate = 115200, timeout = 0) while not isDisposed(): key = getKey() if key != "": # a key is typed if ord(key) == 10: # cr key pressed key = "\r" ser.write(key) nbChars = ser.inWaiting() if nbChars > 0: text = ser.read(nbChars) for ch in text: if ch == '\n': gprintln() else: gprint(ch)
|
MEMO |
|
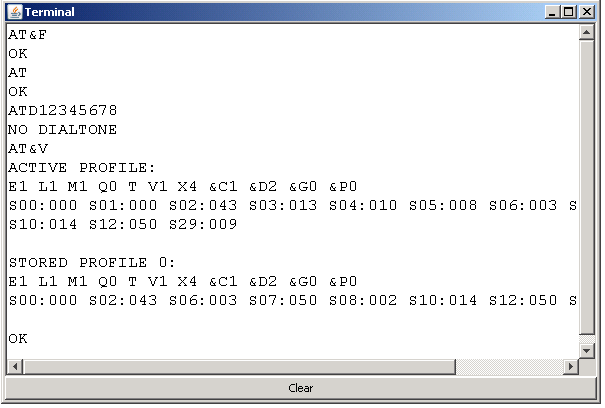
In order to read the received characters you have to use a non-blocking function, since the program has to constantly check if a key has been pressed. The method ser.read() does not block if you set the timeout parameter in the constructor to 0. If you have a notebook with a built-in modem, the terminal program can communicate with it using the Hayes command set.
|


